I’ve been on a bit of a Node.js kick lately. It scales well and is supported on every platform I’ve come across (Embedded, Cloud, and Server). Starting my new business app I decided to move from Django to Node.js for the project so I can leverage Google’s AppEngine platform. All of this is going smoothly and then I wanted to add Social Login support, no various providers have kind of standardized on OAuth. So to avoid having to reinvent the wheel I choose passport.js this package has “strategies” for all major OAuth implementations and typescript support (mostly). Now I like to develop locally and deploy. So here are my simple suggestions for setting up your environment for local development.
All secure OAuth implementations rely on limiting the domain and URLs for callbacks. Most modern implementations (ex: Facebook) now require HTTPS. Depending on the implementation it may not be possible to add local IPs or subnets. That’s not a problem you can alter your local host files to point to your local IP.
SETTING UP YOUR LOCAL HOST FILE
WINDOWS
Windows, believe it or not, has a deep dark Unix/Linux secret that has been present since Windows 95. It’s a host file buried in the dumbest possible spot and it still works! It’s located in the *cough* Windows etc folder. Usually, it’s found here:
C:\Windows\System32\drivers\etcThe hosts file has to be opened as administrator, it can be read by everyone but to save your changes the editor will need elevated privileges. Here’s my current hosts file for reference.
# Copyright (c) 1993-2009 Microsoft Corp.
#
# This is a sample HOSTS file used by Microsoft TCP/IP for Windows.
#
# This file contains the mappings of IP addresses to host names. Each
# entry should be kept on an individual line. The IP address should
# be placed in the first column followed by the corresponding host name.
# The IP address and the host name should be separated by at least one
# space.
#
# Additionally, comments (such as these) may be inserted on individual
# lines or following the machine name denoted by a '#' symbol.
#
# For example:
#
#      102.54.94.97     rhino.acme.com          # source server
#       38.25.63.10     x.acme.com              # x client host

# localhost name resolution is handled within DNS itself.
#	127.0.0.1       localhost
#	::1             localhost
 host.docker.internal
 gateway.docker.internal
# Added by Docker Desktop
192.168.1.25 host.docker.internal
192.168.1.25 gateway.docker.internal
# To allow the same kube context to work on the host and the container:
127.0.0.1 kubernetes.docker.internal
# End of section
127.0.0.1 dev.bzzzeee.com
127.0.0.1 dev.onyxrd.com
You can see the last two entries are examples of DEV hostnames. These allow callbacks from OAuth implementations to be routed to the local development express app. I’d recommend actually having your public DNS setup to route these dev hostnames to the proper production IPs. This will help prevent configuration accidents from breaking production if a dev hostname makes to out to production.
LINUX / MAC
If you’re in a Linux / MAC environment you’ll find your hosts file in the proper location (where it belongs):
/etc/hostsThere really is no difference in the format of the file. As with the windows version you’ll need elevated privileges so pick your editor (vi) and sudo your heart out!
NOTES ON PASSPORT
There are plenty of example references for using passport and it’s associated modules and strategies. That being said there are some nuances to implementations, especially since providers keep updating their terms of service and privacy strategies. These changes make a moving target for some of the information you may want for your Social Login strategy.
Facebook has flipped the switch on OAuth 2.0 and requires an OAuth app developer to utilize HTTPS. This means your express app will need to serve callbacks using HTTPS for development (check below).
There are two areas in your FB app that you’ll want to assure are set up correctly. First is your app domains. For my purposes, I placed the domain and my dev hostname.
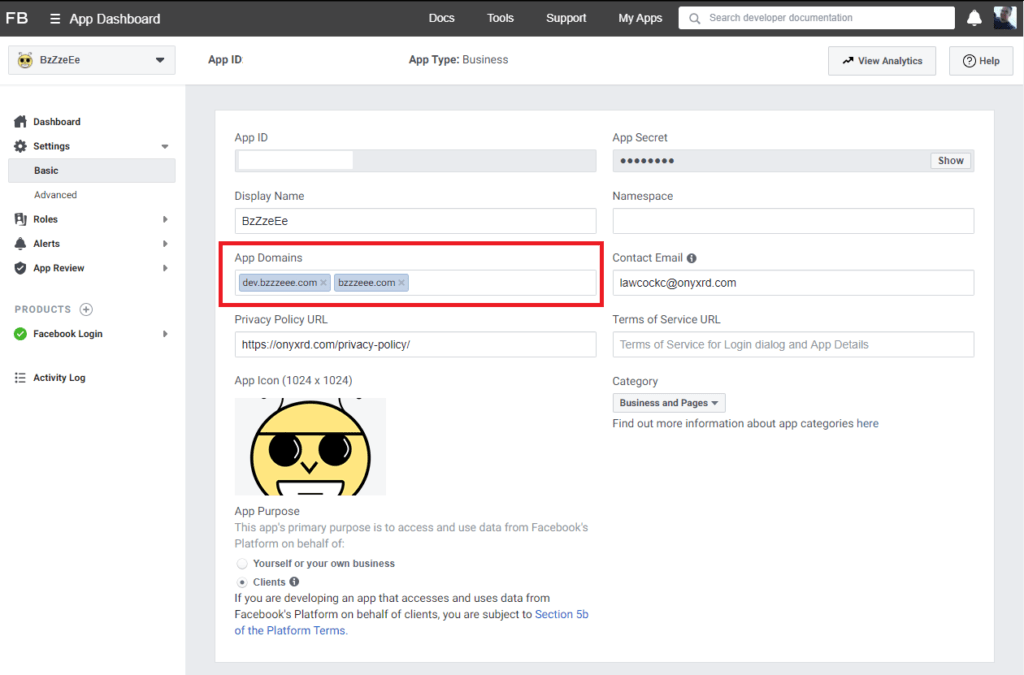
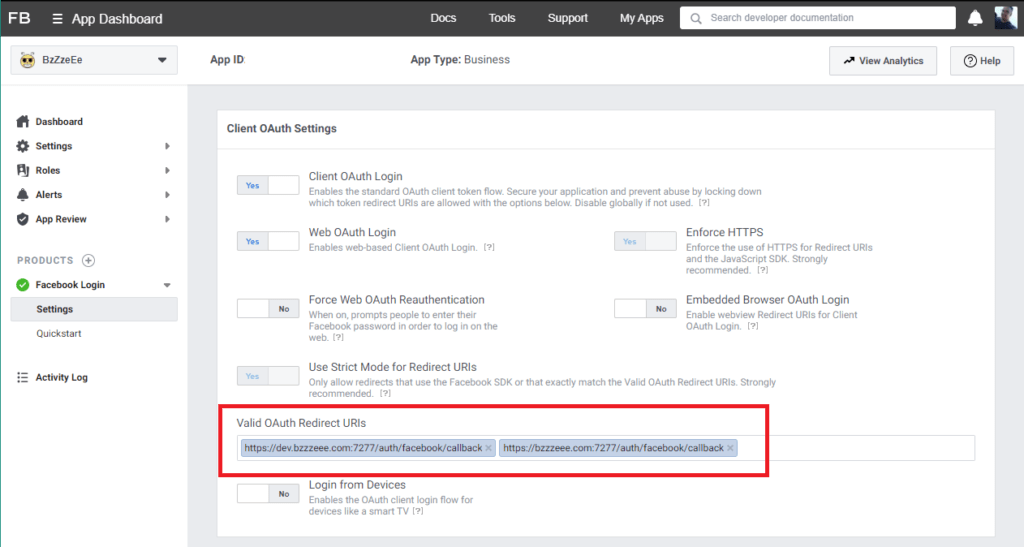
Next you’ll need to make sure you’ve enabled Facebook Login product for your app. The only thing you will need to adjust here are your callbacks. As I’ll do with all implementations, both the development and production callbacks are added to the Valid OAuth Redirect URIs.
Passports facebook (OAUth2.0) strategy doesn’t work out of the box because of the ongoing changes from FB. You may need to add: profileFields: [‘id’, ’emails’, ‘name’] to your StrategyOptions and add a scope AuthenticateOptions to your authentication route ({ scope: [’email’] }).
        passport.use(
            new FaceBookStrategy(
                {
                    clientID: process.env.APP_FACEBOOK_ID as string,
                    clientSecret: process.env.APP_FACEBOOK_SECRET as string,
                    callbackURL: `${process.env.APP_URL}:${process.env.APP_PORT}/auth/facebook/callback`,
                    profileFields: ['id', 'emails', 'name']
                },
                (
                    accessToken : string,
                    refreshToken : string,
                    profile : Profile,
                    done : (error: any, user?: any, info?: any) => void
                ) => {
                    const userProfile : UserProfile =
                    {
                        username: `${profile.provider}#${profile.id}`,
                        password: `${profile.provider}!${profile.displayName}`,
                        email: profile.emails?.[0].value??'no@email.com',
                        passportID: profile.id,
                        passportProvider: profile.provider,
                        firstName: profile.name?.givenName??'',
                        lastName: profile.name?.familyName??''
                    };

                    this.findOrCreateUser(expressApp, userProfile, {accessToken, refreshToken})
                        .then(user=> {
                            done(null, user);
                        })
                        .catch(error=>{
                            done(error, undefined);
                        });
                }
            ));

        expressApp.get('/auth/facebook',
                        passport.authenticate('facebook', { scope: ['email'] }));
As with FB LinkedIn has undergone changes and even the typescript definitions for this strategy are out of date! I’ll be submitting a pull request for the fix but they have about +300 pull requests pending so… You know.
You can see in the image below an example of authorized redirect URLs for your app. Notice for my app I’ve added the development URL and the production URL. I can forget about these once released if I’ve setup my production DNS environment properly (i.e. dev.bzzzzeee.com) pointing at (bzzzzeee.com) and I can still develop on my local box.
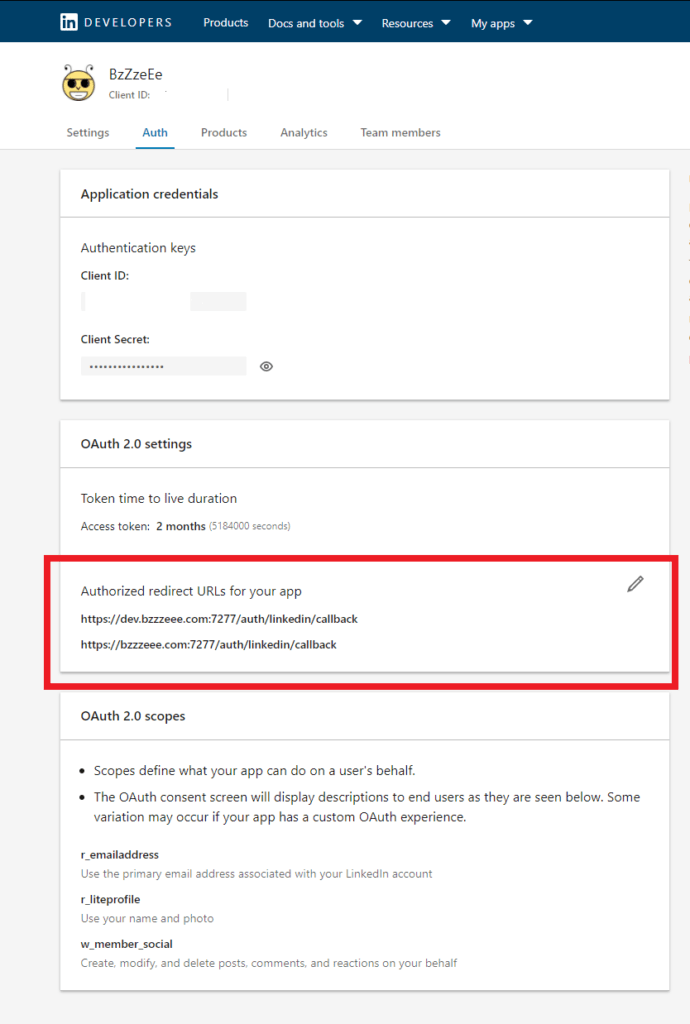
Anyway key points for your setup are probably best expressed from a code snippet
        passport.use(
            new LinkedInStrategy(
                {
                    clientID: process.env.APP_LINKEDIN_KEY as string,
                    clientSecret: process.env.APP_LINKEDIN_SECRET as string,
                    callbackURL: `${process.env.APP_URL}:${process.env.APP_PORT}/auth/linkedin/callback`,
                    //@ts-ignore because type library needs a pull
                    scope: ['r_emailaddress', 'r_liteprofile']
                },
                (
                    accessToken : string,
                    refreshToken : string,
                    profile : Profile,
                    done : (error: any, user?: any, info?: any) => void
                ) => {
                    const userProfile : UserProfile =
                    {
                        username: `${profile.provider}#${profile.id}`,
                        password: `${profile.provider}!${profile.displayName}`,
                        email: profile.emails?.[0].value??'no@email.com',
                        passportID: profile.id,
                        passportProvider: profile.provider,
                        firstName: profile.name?.givenName??'',
                        lastName: profile.name?.familyName??''
                    };
            ));
So you will need to set your scope properly. As of this writing, those two permissions (‘r_emailaddress’, ‘r_liteprofile’) will get the information you need. Passport actually has to make two API calls to LinkedIn one for the access and profile and another for the E-mail address. Go figure.
Twitter was by far the most straightforward to setup. When you create your app make sure to enable support for sign-in with Twitter. The rest is old hat by now my two callback URLs for dev and production.
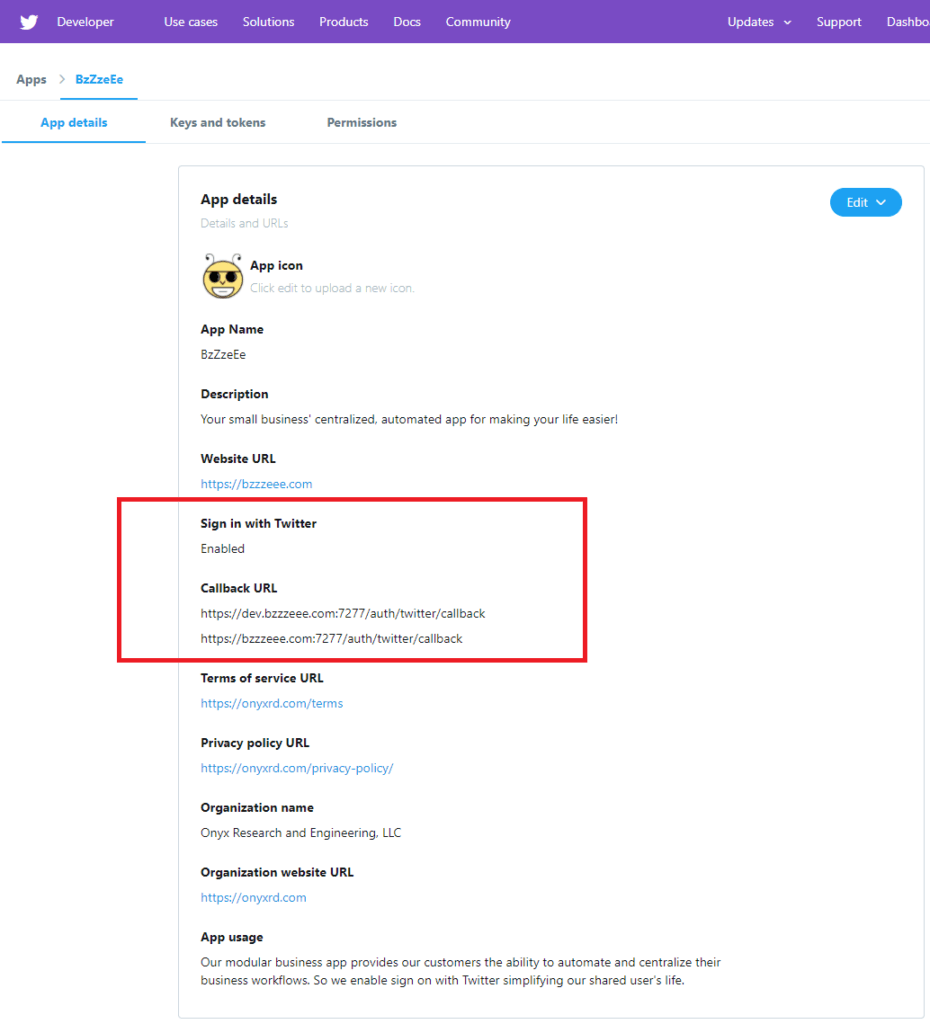
One item, the twitter account’s E-mail requires additional permissions. Which demands a privacy link and terms of service URL for you app before you can click the checkbox. Below is my app’s example.
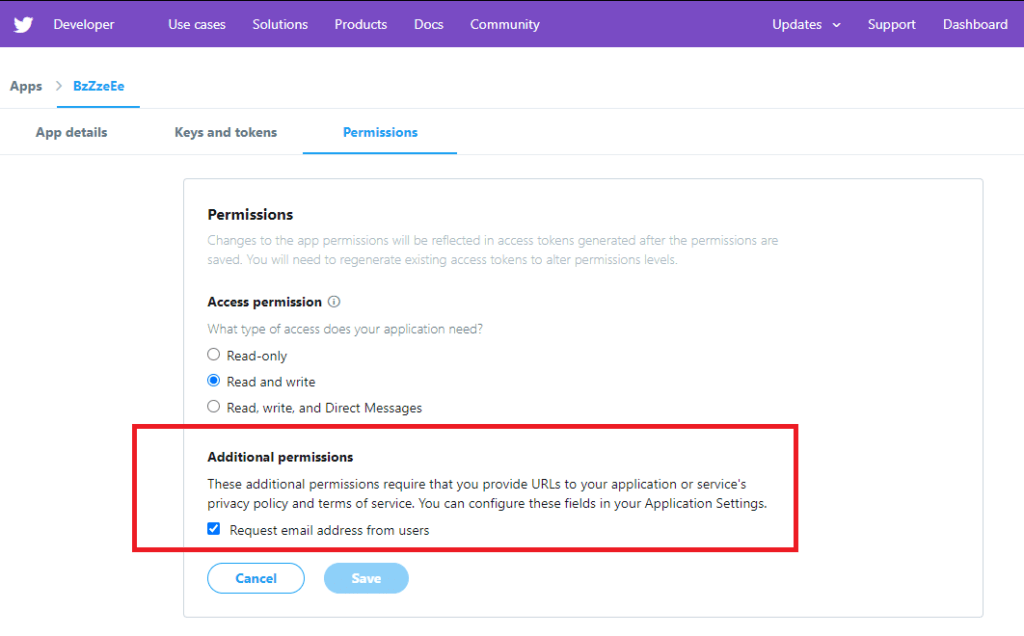
The passport for Twitter OAuth is operational, you will have to add some twitter specific StrategyOptions ( includeEmail: true, includeEntities: true ), other than that you’re good to go!
        passport.use(
            new TwitterStrategy(
                {
                    consumerKey: process.env.APP_TWITTER_KEY as string,
                    consumerSecret: process.env.APP_TWITTER_SECRET as string,
                    callbackURL: `${process.env.APP_URL}:${process.env.APP_PORT}/auth/twitter/callback`,
                    includeEmail: true,
                    includeEntities: true
                },
                (
                    accessToken : string,
                    refreshToken : string,
                    profile : Profile,
                    done : (error: any, user?: any, info?: any) => void
                ) => {
                    const userProfile : UserProfile =
                    {
                        username: `${profile.provider}#${profile.id}`,
                        password: `${profile.provider}!${profile.displayName}`,
                        email: profile.emails?.[0].value??'no@email.com',
                        passportID: profile.id,
                        passportProvider: profile.provider,
                        firstName: profile.name?.givenName??'',
                        lastName: profile.name?.familyName??''
                    };

                    this.findOrCreateUser(expressApp, userProfile, {accessToken, refreshToken})
                        .then(user=> {
                            done(null, user);
                        })
                        .catch(error=>{
                            done(error, undefined);
                        });
                }
            ));
HACKING SOME HTTPS
For certain OAuth providers, you will need to provide HTTPS callback URLs. This is kind of pain as express apps don’t default to HTTPS and in production, this is often handled not by your app but by a proxy that serves your HTTP app and handles the necessary certs in a centralized manner. For development purposes, it doesn’t take much to create a dev cert and then add a few lines to your express app to serve HTTPS (Your browser is still going to complain about the validity of the cert but that’s ok). You can leverage OpenSSL to generate the necessary certificate and private key.
GENERATE YOUR KEYS
openssl req -x509 -newkey rsa:2048 -keyout site.pem -out cert.pem -days 365
openssl rsa -in site.pem -out key.pem
MODIFY YOUR EXPRESS
I’ll leave the actual implementation details for you. But the snippet below gives you the broad strokes.
        if (process.env.APP_ENV !== 'DEV')
        {
            this.server = express.listen(parseInt(process.env.APP_PORT as string), process.env.APP_HOSTNAME as string);
        } else {
            const key = fs.readFileSync('./key.pem');
            const cert = fs.readFileSync('./cert.pem');

            this.server = https.createServer({key: key, cert: cert },
            express).listen(parseInt(process.env.APP_PORT as string), process.env.APP_HOSTNAME as string);
        }
    }