• Skip to primary navigation
  • Skip to main content
  • Skip to footer
Onyx Research and Engineering, LLC

ONYX

Your Vision. Our solutions.

  • HOME
  • PAST WORK
  • CONTACT US
  • PRIVACY

Web

ONYXCAM

November 8, 2020 by Chris Lawcock

I always wanted an extensible platform for prototyping my machine vision tests and a potential hardware product for tracking and volumetric capture. Here are my first three devices!

ONYXCAM Powered
ONYXCAMS

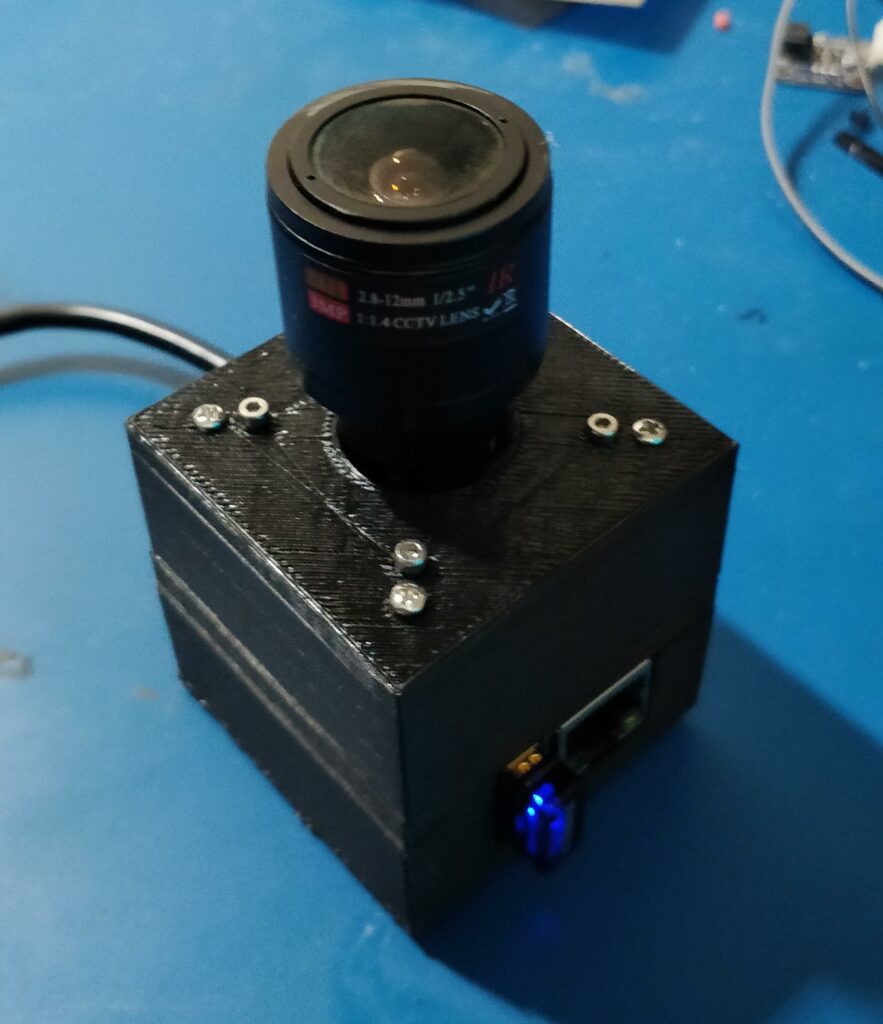
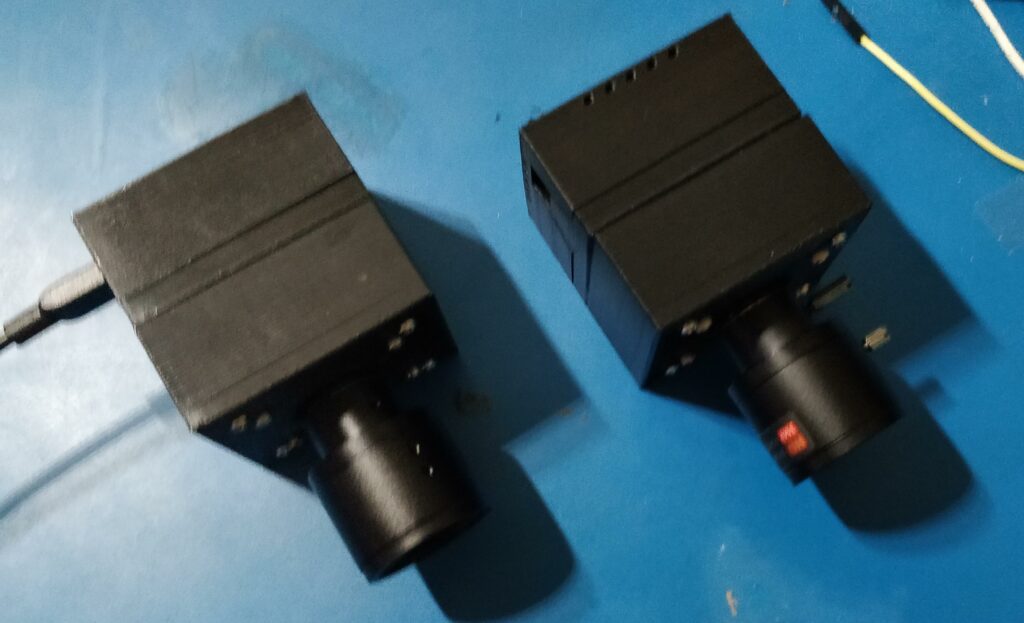
The housings of the first three prototypes are printed 3 part PLA with an aluminum heatsink. You can see from the video above a simple flyout of the design.

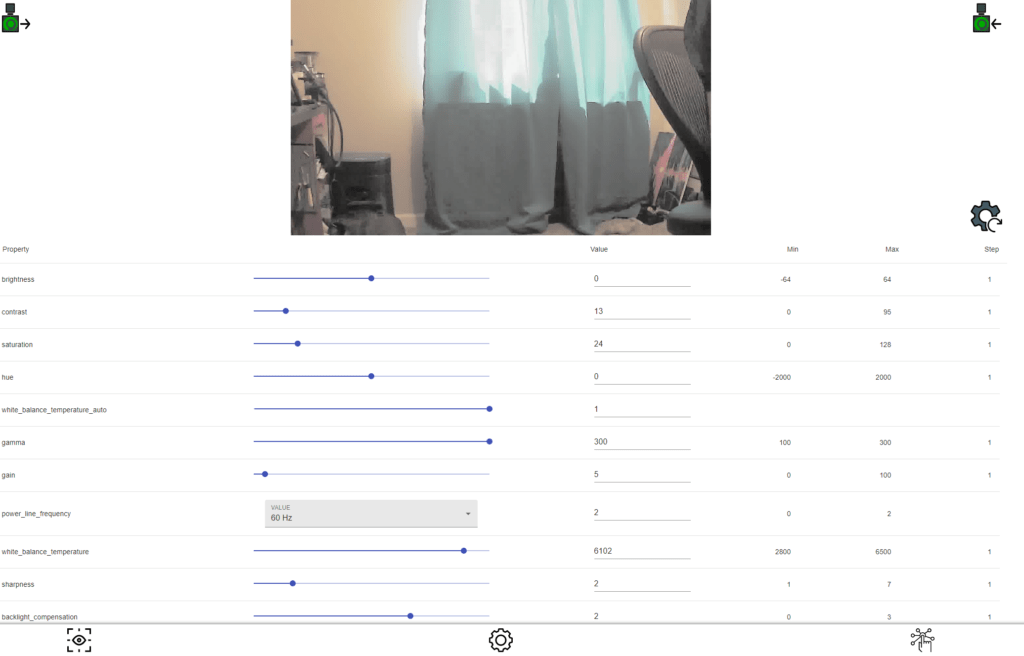
The cameras run a custom built version of Linux which leverages custom DTB to expose all available USB ports of the SOC. The cameras run a web server which hosts a node.js and serves a react app for camera preview, configuration and control!

Camera settings view
Live stream CPU stats view
Apps view with two apps active
App upload view drop and drag

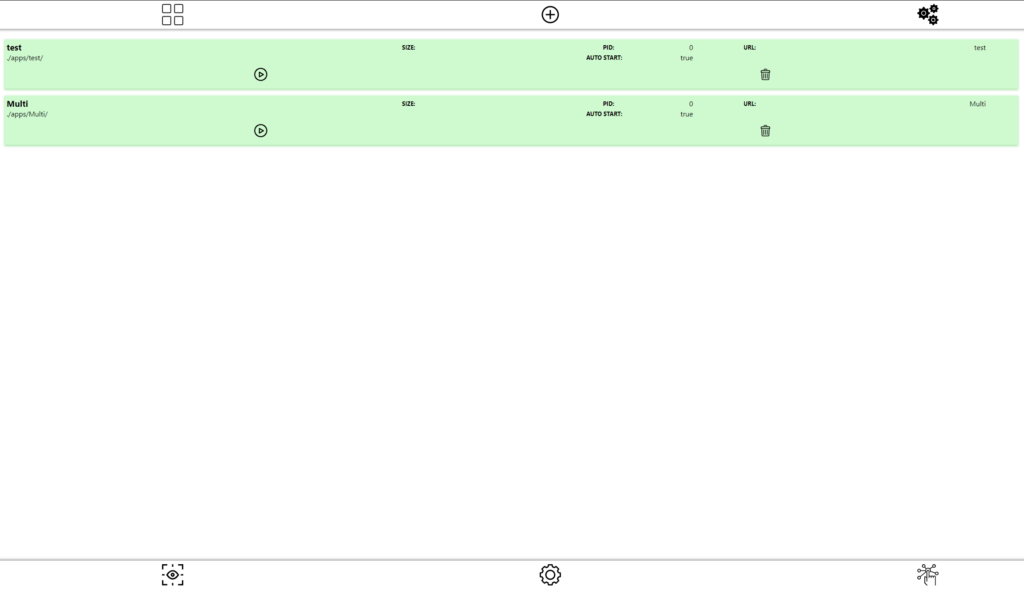
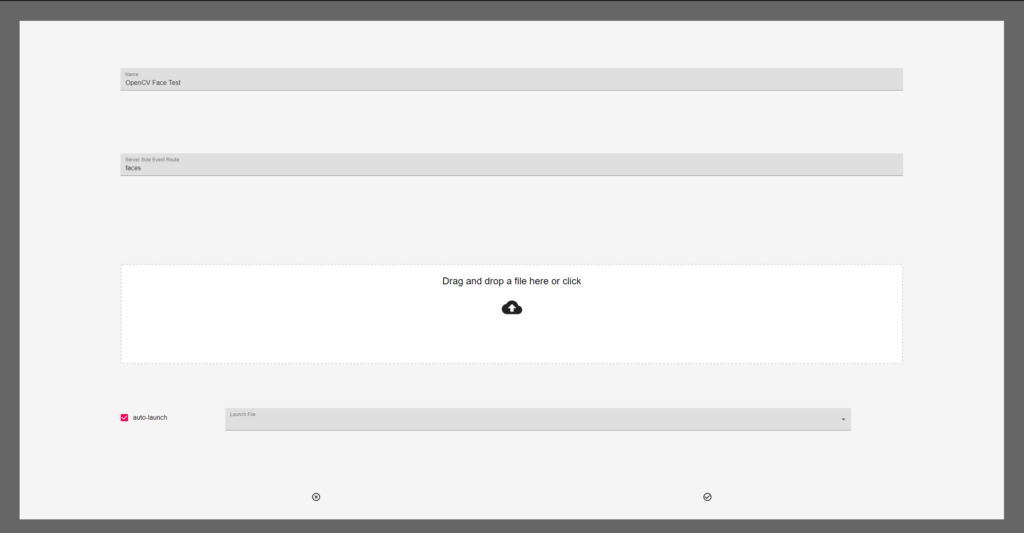
Over all pretty happy with the design, now the fun begins prototyping and extending the API.

Filed Under: C/C++, Hardware Development, HTML, JavaScript, Linux Hardware, Linux Software, Node.JS, React, Software Development, Web Tagged With: Embbed, html, linux, NODE.JS, React, web

TODAY’S SEO GAME

October 31, 2020 by Chris Lawcock

Back in the day (don’t all great stories start this way?) when search engines were new it was easy to have a web presence and with a few pages and a healthy dash of metatags and you were off to the races! These days with machine learning and continuously improving data analytics you have to engage in a great deal of effort to rank naturally and metatags and a nice website are not enough! You’re going to need a plan.

SEO IS ABOUT RELEVANCE

So, whatever you do, there are probably others in your market space and industry who’ve been doing it longer. This isn’t a problem, just a reality. You can hope that they haven’t been engaging customers on the web or social media platforms, but who would want to take those odds? Here, let’s take a simple example: Pool Supplies.

So here is an interesting tale of two companies:

AZ Pool Supply Warehouse – A small local single location pool supply company.

Lesile’s Pools – A nationwide pool supply company started in 1963 in California.

First we’ll start with the Google Ad’s to the search:

Google search AD results

So there is Leslie’s “buying” their way to the top of the list. Not a bad choice at all for a nationwide company. Not surprising, but the next image is!

Google natural search results

These are the “natural” results. Basically, azpoolsupplywarehouse.com is considered by Google to be more relevant! Take a look at both of their sites, to the human eye they’re both “doing” the same thing. In terms of SEO, the sites and the company’s web presence are not equal. Just think about “buying” your top spot. Ok. So when you Google do you go to the very first AD returned? Probably not, at a minimum if it’s local you check the map for the closest locations. Do you check the “natural” results vs the AD before you click? Most likely. So in a perfect business world, you want both top spots!

LAY OF THE LAND

You’ve got a business to run! Do you have time to learn the lay of the SEO land? Well, if you want those ambient sales that come from more than your physical presence or word of mouth, you’ll need to. It’s an investment. Anyone telling you otherwise is selling you snake oil. Make sure your business and its website are registered with Google. You’re going to need to become comfortable with as many social media platforms and business platforms as possible and create a company presence. Try out Namechk. It will be a bit overwhelming, it’s a lot, but it matters! Once you’ve taken these first steps, it’s time to consider blogs, posts, and perhaps an ad campaign on the most appropriate platforms. This is not a fire and forget process these days. You’ll need to tend to your platforms, engage your customers, and share. Sound tiring? It doesn’t have to be with the right team on your side.

We love helping small business thrive and we’d love to help you!

Loading

Filed Under: HTML, SEO, Web Tagged With: Search, SEO, Small Business, web

SIMPLE SITE GUIDANCE FOR A SMALL BUSINESS

October 26, 2020 by Chris Lawcock

More than likely you’re not in the business of design and that’s just fine. That being said, you should at least consider a few things regarding your business’ website and make sure whomever you’ve engaged to make or maintain your site is making good choices for your visitors. Here’s a quick checklist of the most perceptible and obvious site consideration.

Rainbows of color!

1. CONSISTENT COLOR SCHEME

There’s a lot to know about color and how it can be used. As a small business owner, for now anyway, just focus on a simple question: How many colors are in my site’s color scheme?

In general, your colors should come from your company’s logo or perhaps your call to action image on your front page. But at most you should be looking at four colors to create understanding and drive interaction.

2. BALANCED AND HARMONIOUS

Open your site, no matter what the layout. Does it have balance? Your eyes should be able to pick a dominant feature (hopefully related to what you do!) and from there you should intuitively know what to do next. Your site should allow your visitor to flow through. (Ex: Nike, Google, Adobe) There should be a sense of harmony, a cadence that keeps your visitor engaged. Like this post? (1 – 2 – 3)

3. NEGATIVE IS POSITIVE

Probably the only time in life you’ll hear that! In this case, we’re talking about negative space or how busy is your site? Using negative space (lack of stuff) allows your visitor to be drawn to what matters (Your business!) and doesn’t make them work (Cognitive loads are bad mmmm kay?)

WRAPPING IT UP

These are just a few items that are easy to consider as a small business owner. Hopefully you look at your site and are able to nod your head in agreement with the above items. If not? We’d love to chat about the basics and a whole lot more! (Heck we didn’t even get into SEO or any of the finer points of site design)

Loading

Filed Under: HTML, Uncategorized, Web Tagged With: BALANCE, BUSINESS, COLOR, DESIGN, HARMONY, SCHEME, WEBSITES

PASSPORT DEV SETUP

October 1, 2020 by Chris Lawcock

I’ve been on a bit of a Node.js kick lately. It scales well and is supported on every platform I’ve come across (Embedded, Cloud, and Server). Starting my new business app I decided to move from Django to Node.js for the project so I can leverage Google’s AppEngine platform. All of this is going smoothly and then I wanted to add Social Login support, no various providers have kind of standardized on OAuth. So to avoid having to reinvent the wheel I choose passport.js this package has “strategies” for all major OAuth implementations and typescript support (mostly). Now I like to develop locally and deploy. So here are my simple suggestions for setting up your environment for local development.

All secure OAuth implementations rely on limiting the domain and URLs for callbacks. Most modern implementations (ex: Facebook) now require HTTPS. Depending on the implementation it may not be possible to add local IPs or subnets. That’s not a problem you can alter your local host files to point to your local IP.

SETTING UP YOUR LOCAL HOST FILE

WINDOWS

Windows, believe it or not, has a deep dark Unix/Linux secret that has been present since Windows 95. It’s a host file buried in the dumbest possible spot and it still works! It’s located in the *cough* Windows etc folder. Usually, it’s found here:

C:\Windows\System32\drivers\etc

The hosts file has to be opened as administrator, it can be read by everyone but to save your changes the editor will need elevated privileges. Here’s my current hosts file for reference.

# Copyright (c) 1993-2009 Microsoft Corp.
#
# This is a sample HOSTS file used by Microsoft TCP/IP for Windows.
#
# This file contains the mappings of IP addresses to host names. Each
# entry should be kept on an individual line. The IP address should
# be placed in the first column followed by the corresponding host name.
# The IP address and the host name should be separated by at least one
# space.
#
# Additionally, comments (such as these) may be inserted on individual
# lines or following the machine name denoted by a '#' symbol.
#
# For example:
#
#      102.54.94.97     rhino.acme.com          # source server
#       38.25.63.10     x.acme.com              # x client host

# localhost name resolution is handled within DNS itself.
#	127.0.0.1       localhost
#	::1             localhost
 host.docker.internal
 gateway.docker.internal
# Added by Docker Desktop
192.168.1.25 host.docker.internal
192.168.1.25 gateway.docker.internal
# To allow the same kube context to work on the host and the container:
127.0.0.1 kubernetes.docker.internal
# End of section
127.0.0.1 dev.bzzzeee.com
127.0.0.1 dev.onyxrd.com

You can see the last two entries are examples of DEV hostnames. These allow callbacks from OAuth implementations to be routed to the local development express app. I’d recommend actually having your public DNS setup to route these dev hostnames to the proper production IPs. This will help prevent configuration accidents from breaking production if a dev hostname makes to out to production.

LINUX / MAC

If you’re in a Linux / MAC environment you’ll find your hosts file in the proper location (where it belongs):

/etc/hosts

There really is no difference in the format of the file. As with the windows version you’ll need elevated privileges so pick your editor (vi) and sudo your heart out!

NOTES ON PASSPORT

There are plenty of example references for using passport and it’s associated modules and strategies. That being said there are some nuances to implementations, especially since providers keep updating their terms of service and privacy strategies. These changes make a moving target for some of the information you may want for your Social Login strategy.

FACEBOOK

Facebook has flipped the switch on OAuth 2.0 and requires an OAuth app developer to utilize HTTPS. This means your express app will need to serve callbacks using HTTPS for development (check below).

There are two areas in your FB app that you’ll want to assure are set up correctly. First is your app domains. For my purposes, I placed the domain and my dev hostname.

FB App Basic Settings

Next you’ll need to make sure you’ve enabled Facebook Login product for your app. The only thing you will need to adjust here are your callbacks. As I’ll do with all implementations, both the development and production callbacks are added to the Valid OAuth Redirect URIs.

FB Logon Settings

Passports facebook (OAUth2.0) strategy doesn’t work out of the box because of the ongoing changes from FB. You may need to add: profileFields: [‘id’, ’emails’, ‘name’] to your StrategyOptions and add a scope AuthenticateOptions to your authentication route ({ scope: [’email’] }).

        passport.use(
            new FaceBookStrategy(
                {
                    clientID: process.env.APP_FACEBOOK_ID as string,
                    clientSecret: process.env.APP_FACEBOOK_SECRET as string,
                    callbackURL: `${process.env.APP_URL}:${process.env.APP_PORT}/auth/facebook/callback`,
                    profileFields: ['id', 'emails', 'name']
                },
                (
                    accessToken : string, 
                    refreshToken : string, 
                    profile : Profile, 
                    done : (error: any, user?: any, info?: any) => void
                ) => {
                    const userProfile : UserProfile =
                    { 
                        username: `${profile.provider}#${profile.id}`, 
                        password: `${profile.provider}!${profile.displayName}`, 
                        email: profile.emails?.[0].value??'no@email.com', 
                        passportID: profile.id,
                        passportProvider: profile.provider,
                        firstName: profile.name?.givenName??'', 
                        lastName: profile.name?.familyName??''
                    };

                    this.findOrCreateUser(expressApp, userProfile, {accessToken, refreshToken})
                        .then(user=> {
                            done(null, user);
                        })
                        .catch(error=>{
                            done(error, undefined);
                        });
                }
            ));

        expressApp.get('/auth/facebook',
                        passport.authenticate('facebook', { scope: ['email'] }));

LINKEDIN

As with FB LinkedIn has undergone changes and even the typescript definitions for this strategy are out of date! I’ll be submitting a pull request for the fix but they have about +300 pull requests pending so… You know.

You can see in the image below an example of authorized redirect URLs for your app. Notice for my app I’ve added the development URL and the production URL. I can forget about these once released if I’ve setup my production DNS environment properly (i.e. dev.bzzzzeee.com) pointing at (bzzzzeee.com) and I can still develop on my local box.

LinkedIn App Auth Page

Anyway key points for your setup are probably best expressed from a code snippet

        passport.use(
            new LinkedInStrategy(
                {
                    clientID: process.env.APP_LINKEDIN_KEY as string,
                    clientSecret: process.env.APP_LINKEDIN_SECRET as string,
                    callbackURL: `${process.env.APP_URL}:${process.env.APP_PORT}/auth/linkedin/callback`,
                    //@ts-ignore because type library needs a pull
                    scope: ['r_emailaddress', 'r_liteprofile']
                },
                (
                    accessToken : string, 
                    refreshToken : string, 
                    profile : Profile, 
                    done : (error: any, user?: any, info?: any) => void
                ) => {
                    const userProfile : UserProfile =
                    { 
                        username: `${profile.provider}#${profile.id}`, 
                        password: `${profile.provider}!${profile.displayName}`, 
                        email: profile.emails?.[0].value??'no@email.com', 
                        passportID: profile.id,
                        passportProvider: profile.provider,
                        firstName: profile.name?.givenName??'', 
                        lastName: profile.name?.familyName??'' 
                    };
            ));

So you will need to set your scope properly. As of this writing, those two permissions (‘r_emailaddress’, ‘r_liteprofile’) will get the information you need. Passport actually has to make two API calls to LinkedIn one for the access and profile and another for the E-mail address. Go figure.

TWITTER

Twitter was by far the most straightforward to setup. When you create your app make sure to enable support for sign-in with Twitter. The rest is old hat by now my two callback URLs for dev and production.

Twitter App Details

One item, the twitter account’s E-mail requires additional permissions. Which demands a privacy link and terms of service URL for you app before you can click the checkbox. Below is my app’s example.

The passport for Twitter OAuth is operational, you will have to add some twitter specific StrategyOptions ( includeEmail: true, includeEntities: true ), other than that you’re good to go!

        passport.use(
            new TwitterStrategy(
                {
                    consumerKey: process.env.APP_TWITTER_KEY as string,
                    consumerSecret: process.env.APP_TWITTER_SECRET as string,
                    callbackURL: `${process.env.APP_URL}:${process.env.APP_PORT}/auth/twitter/callback`,
                    includeEmail: true,
                    includeEntities: true
                },
                (
                    accessToken : string, 
                    refreshToken : string, 
                    profile : Profile, 
                    done : (error: any, user?: any, info?: any) => void
                ) => {
                    const userProfile : UserProfile =
                    { 
                        username: `${profile.provider}#${profile.id}`, 
                        password: `${profile.provider}!${profile.displayName}`, 
                        email: profile.emails?.[0].value??'no@email.com', 
                        passportID: profile.id,
                        passportProvider: profile.provider,
                        firstName: profile.name?.givenName??'', 
                        lastName: profile.name?.familyName??''
                    };

                    this.findOrCreateUser(expressApp, userProfile, {accessToken, refreshToken})
                        .then(user=> {
                            done(null, user);
                        })
                        .catch(error=>{
                            done(error, undefined);
                        });
                }
            ));

HACKING SOME HTTPS

For certain OAuth providers, you will need to provide HTTPS callback URLs. This is kind of pain as express apps don’t default to HTTPS and in production, this is often handled not by your app but by a proxy that serves your HTTP app and handles the necessary certs in a centralized manner. For development purposes, it doesn’t take much to create a dev cert and then add a few lines to your express app to serve HTTPS (Your browser is still going to complain about the validity of the cert but that’s ok). You can leverage OpenSSL to generate the necessary certificate and private key.

GENERATE YOUR KEYS

openssl req -x509 -newkey rsa:2048 -keyout site.pem -out cert.pem -days 365
openssl rsa -in site.pem -out key.pem

MODIFY YOUR EXPRESS

I’ll leave the actual implementation details for you. But the snippet below gives you the broad strokes.

        if (process.env.APP_ENV !== 'DEV')
        {
            this.server = express.listen(parseInt(process.env.APP_PORT as string), process.env.APP_HOSTNAME as string);
        } else {
            const key = fs.readFileSync('./key.pem');
            const cert = fs.readFileSync('./cert.pem');
    
            this.server = https.createServer({key: key, cert: cert }, 
            express).listen(parseInt(process.env.APP_PORT as string), process.env.APP_HOSTNAME as string);
        }
    }

Filed Under: JavaScript, Node.JS, React, TypeScript, Web Tagged With: DEVELOPMENT, JAVASCRIPT, NODE, NODE.JS, PASSPORT

WP and Permalinks

March 23, 2020 by Chris Lawcock

Once in a great while when upgrading a site or when an administrator gets overly ambitions one way or the other a site’s permalinks break if they are switched from default. Googling this issue will yield a wild array of “fixes”, I’m a big fan of actually understanding and not incantations. So, I thought I’d take a moment out of my day and go through this common and minor issue with Apache2 and WordPress.

WordPress does a marvelous job of managing its own .htaccess file. Using the default “Plain” permalinks selection from Settings > Permalinks will produce a blank .htaccess file in the root of your WordPress folder. Selecting “Post name” will generate an .htaccess file similar to the following:

# BEGIN WordPress
# The directives (lines) between `BEGIN WordPress` and `END WordPress` are
# dynamically generated, and should only be modified via WordPress filters.
# Any changes to the directives between these markers will be overwritten.
<IfModule mod_rewrite.c>
RewriteEngine On
RewriteBase /
RewriteRule ^index\.php$ - [L]
RewriteCond %{REQUEST_FILENAME} !-f
RewriteCond %{REQUEST_FILENAME} !-d
RewriteRule . /index.php [L]
</IfModule>

# END WordPress

So, the above file gives us quite a few hints on where we should start our journey.

  1. If our .htaccess file in the root of our WP site doesn’t contain this, then permissions or flags are probably borked on our server. You should check your permissions and user/group for your site and server. (Permissions)
  2. You have something like the above! Congrats! So now we are on to your Apache site config is improperly configured to utilize the .htaccess file (Check your config) or somehow Apache’s mod_rewrite module is not installed.

PERMISSIONS AND OWNERSHIP

Your permissions shouldn’t change much under various Linux distros. The following examples reference a Ubuntu server (16.04 – 18.04) LAMP installation.

OWNERSHIP

So let’s get ownership of our folder out of the way. Your WordPress folder should be owned by the server’s web server user. In Ubuntu land this is www-data is a user and group which is utilized by Apache and other web servers. So we will make sure our folder is “owned” by this user.

sudo chown -R www-data:root /var/www/[wordpress_site]

So, the above will set the owning user to www-data and leave the group owner to root. Performing a simple “ls -l /var/www/[wordpress_site]” should yield something similar to the following.

-rw-r-----  1 www-data root   420 Nov 30  2017 index.php
-rw-r-----  1 www-data root 19935 Jan  1  2019 license.txt
-rw-r-----  1 www-data root  7368 Sep  2  2019 readme.html
-rw-r-----  1 www-data root  6939 Sep  3  2019 wp-activate.php
drwxr-x---  9 www-data root  4096 Dec 18 22:16 wp-admin
-rw-r-----  1 www-data root   369 Nov 30  2017 wp-blog-header.php
-rw-r-----  1 www-data root  2283 Jan 21  2019 wp-comments-post.php
-rw-r-----  1 www-data root  3217 Mar 23 16:06 wp-config.php
drwxr-x---  7 www-data root  4096 Mar 23 15:18 wp-content
-rw-r-----  1 www-data root  3955 Oct 10 23:52 wp-cron.php
drwxr-x--- 20 www-data root 12288 Dec 18 22:16 wp-includes
-rw-r-----  1 www-data root  2504 Sep  3  2019 wp-links-opml.php
-rw-r-----  1 www-data root  3326 Sep  3  2019 wp-load.php
-rw-r-----  1 www-data root 47597 Dec  9 13:30 wp-login.php
-rw-r-----  1 www-data root  8483 Sep  3  2019 wp-mail.php
-rw-r-----  1 www-data root 19120 Oct 15 16:37 wp-settings.php
-rw-r-----  1 www-data root 31112 Sep  3  2019 wp-signup.php
-rw-r-----  1 www-data root  4764 Nov 30  2017 wp-trackback.php
-rw-r-----  1 www-data root  3150 Jul  1  2019 xmlrpc.php

If you are not running an Ubuntu server, you may need to determine what account your particular web server is running under. Give “lsof -i | grep :http” a try. This will list open files using with IP based connections and the grep will filter to only http/s ports. This will give you the user the file is opened under.

Chris

PERMISSIONS

Permission flags under Linux are always so concise and easy to understand (I’m looking at you Windows and Active Directory). In the case of a WordPress site, we want to lock down folders and files slightly differently.

FILES FIRST

sudo find /var/www/[wordpress_site] -type f -print0|xargs -0 chmod 640

DIRECTORIES NEXT

sudo find /var/www/wp.onyxrd.com -type d -print0|xargs -0 chmod 750

In case you were wondering what the above two snippets do exactly they leverage the find command to search for a file of a particular type. -type f (file) -type d (directory) -print0 changes the output to no formatting and then we pipe it to xargs which uses the output to call chmod with the appropriate access flags. So for files the user has read and write access and the group has read. Directories are set for user full control, while the group can only read and list the contents. Other permission is locked down.

READWRITEEXECUTEVALUEACCESS
X––4READ
–X–2WRITE
––X1EXECUTE
X–X5READ AND EXECUTE
XX–6READ AND WRITE
NO EXECUTE
XXX7DO EVERYTHING

SITE CONFIG

Oh boy, so our file permissions and ownership are just fine. Great! So now I guess we’ll check the site’s directory configuration. Joy. Ubuntu stores it’s Apache site configs in “/etc/apache2/sites-available/“. I’m going to make several assumptions here:

  1. Your site is WordPress site is operational, you just wanted to get fancy with your permalinks (and that breaks).
  2. You’re using Ubuntu server
  3. You’re using Apache2

If any of the above is not true, especially item one, then this post is probably not going to be helpful (Congrats though on reading all the way down to here!) Trudging on, find your particular conf file, I prefer sane naming conventions (i.e. yoursite.com.conf) here is an abbreviated sample conf.

#Basic HTTP Virtual Host
<VirtualHost *:80>
    ServerAdmin info@example.com
    DocumentRoot /var/www/example.com
    ServerName example.com
    ServerAlias *.example.com

    <Directory /var/www/example.com >
         AllowOverride All
    </Directory>
</VirtualHost>

So this is a simplified config for all IP virtual host of the server on port 80 (HTTP) [VirtualHost *:80]. The only important line for today’s struggle is the Directory declaration and the line that must exist:

AllowOverride All

If this line has been omitted then the .htaccess file will not be honored by the Apache server. Okay, so we’ve addressed the last known issue I’ve had with a WordPress setup and Permalinks. It’s time to throw a restart at your Apache and fingers crossed your new Permalink configuration just works.

sudo service apache2 restart

No one in this day and age should be hosting a site unsecured. If you are running an unprotected site then shame on you! Stop what you are doing and go hit up Let’s Encrypt and fix that shameful situation immediately.

Chris

Filed Under: Linux Software, Web, WordPress Tagged With: apache2, html, https, permalinks, web, wordpress, Wp

Footer

Recent Posts

  • ONYXCAM
  • TODAY’S SEO GAME
  • SIMPLE SITE GUIDANCE FOR A SMALL BUSINESS
  • PASSPORT DEV SETUP
  • BUILDROOT SMOKE TEST
  • Facebook
  • LinkedIn
  • Twitter
  • YouTube
  • PROJECTS
  • POSTS
  • LOGIN

Copyright © 2025 · Onyx Research and Engineering, LLC

This website uses cookies to improve your experience. We'll assume you're ok with this, but you can opt-out if you wish. Cookie settingsACCEPT
Privacy & Cookies Policy

Privacy Overview

This website uses cookies to improve your experience while you navigate through the website. Out of these cookies, the cookies that are categorized as necessary are stored on your browser as they are essential for the working of basic functionalities of the website. We also use third-party cookies that help us analyze and understand how you use this website. These cookies will be stored in your browser only with your consent. You also have the option to opt-out of these cookies. But opting out of some of these cookies may have an effect on your browsing experience.
Necessary
Always Enabled
Necessary cookies are absolutely essential for the website to function properly. This category only includes cookies that ensures basic functionalities and security features of the website. These cookies do not store any personal information.
Non-necessary
Any cookies that may not be particularly necessary for the website to function and is used specifically to collect user personal data via analytics, ads, other embedded contents are termed as non-necessary cookies. It is mandatory to procure user consent prior to running these cookies on your website.
SAVE & ACCEPT